
Background
The Black Vault is excited to be a part of an open-source project that provides a UFO Detector – a software tool that will let you utilize your computer and camera to scan the skies for possible UFOs.
The software is powered by UFOID.net, and the programmer has created a computer algorithm to scan a video feed from your computer’s camera. Once a light emitting object is detected, the program will analyze whether it’s a bird, a plane, a helicopter, a bug, or quite possibly… a UFO! It’s smart enough to omit video capture when it can identify the object, while capturing the true unknowns in a lossless video compression format — the best format your computer can output!
That’s right, this software continuously analyses the sky for movement and will omit the obvious and explainable objects. When it sees, what it believes, can be a UFO; it will record the video in the best available quality, and save the clip for you to review later.
The software is not meant to be a 100% accurate filter, however, it will save HOURS of time sifting through video, and produce a short list of results of probable UFO candidates for you to look at.
The software is fully open source. This means that anyone can read the code that runs the software and help add new features and improvements.”
Want to take part? Download the FREE software, and get started today!
What cameras should I use?
To use this software, you need a good web camera.
Download

Version 0.7.8 – Released 10/28/2017
(Windows)
System Requirements
– Windows OS (More platforms are planned)
– USB Camera
– VLC Media Player
Other video devices like IP cameras and capture cards can be used through XSplit (https://www.xsplit.com/) or Manycam (http://manycam.com/).
Need help or have suggestions? Write to contact@theblackvault.com.
How to install
Before you run the UFO Detector, connect your USB webcam to your PC and position the webcam in an ideal place including as much of the sky in your field of view as possible. More information about the webcam placement can be found in the Tips & Hints section.
Installation of the software is as easy as it gets. First, make sure you have the VLC media player installed so you can play the videos properly.
Then, download the .zip file to your left. Once you download, you can unzip the contents to a temporary folder then run the setup.exe. You can then choose the destination, and follow the on-screen prompts.
Once installed, you should see a shortcut “Detector” on your Desktop or Start menu. Double click it to start the program
The first step, is to configure the software. To do so, click on the Settings button on the top right.
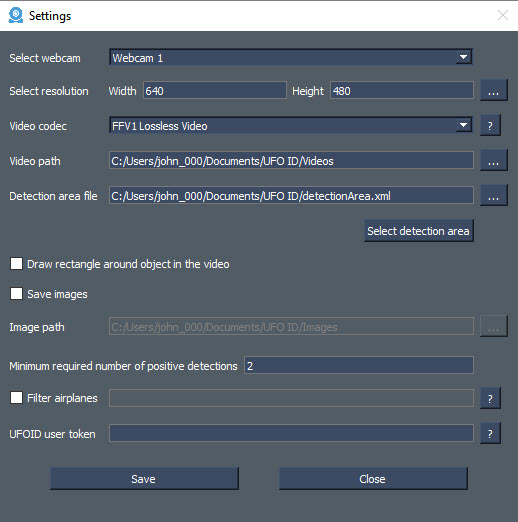
Then you will need to fill in the pertinent information. At this step, you will Select Webcam, Select Resolution (different for each camera. Make sure you have to correct information about your cameras resolution. Up to 1280×720 HD is supported), select Video Path and Image Path (empty folders are in the program directory and are preselected) and the optional settings of “Draw rectangle around objects in video,” and also “Save images.” I recommend keeping these last two objects checked. “Save images” will store all the images of the objects that caused a positive detection. This is useful if you want to help improve the algorithm further by submitting the images that wrongly caused a positive detection.
Once you select these options (we skipped Area file and “Select detection area” for now) you will need hit the buttonSave and restart the program.
Once you restart the program, you should see a video from your webcam displayed. If no video is displayed go to the settings and change your selected webcam and/or the resolution until the video from the camera is displayed.
Now we are going to click Select Detection Area.
This window allows you to select your own area of detection which should contain ONLY the sky.
First click on Take Picture to take a picture from your camera view.
Once you see the picture, you then click reference points around the photo, essentially drawing a box around where you want the software to look for objects.
If the entire camera view is open sky, then draw three points, top left, bottom left, top right, and then click the button that says Connect to connect the first dot to the last dot. If you have a daytime shot with a tree in the view draw around the tree (above). Each situation is different, so draw accordingly.
Once you connect the dots, click on the Save to file button. The information about your selected area of detection is stored in the xml specified in the settings in the Area file field. Once you see the successful save message at the top, you are ready to scan the skies! Just click on the “Detect” button, and you are off and running.
To know it’s working, once you press Detect you will see, “Detection started on……” when it isn’t detecting, you will see, “Detection not running.”
Tips & Hints:
– The “Filter noise by pixel size” allows you to ignore the noise that the camera might pick up. Start the detecting process and move the slider higher until the program stops constantly detecting movement/noise. 2 is a good level for most cameras.
– The better your webcam is the better results you will get in the detection. Full HD detection is not supported currently as most webcams which have Full HD can only take Full HD single pictures and not video. 720p is ideal and more than adequate for a UFO video to be analyzed.
– A good webcam placement is crucial. Most false-positive detections happens when the webcam tries to refocus itself. If the webcam is placed behind a window, try to put the lens as close to the glass as possible to avoid the webcam loosing focus. If possible, turn off the auto-focus feature.
– Try to put something right behind the webcam to avoid light from inside reflecting on the window when you are using the program during the night.
– You want to try to get as much sky in your field of view as possible. Just pointing the webcam straight up is obviously not the best idea.
– It is recommended to not display the video from the webcam during the detection to achieve the best performance.
How to submit a video
Once you have a video that shows a UFO submit it to share it with the community. Simply click on the button by the video that says SHARE. Add the optional information, and the software will do the rest!
They will then be placed in The Black Vault, which will provide an archive of all the submitted videos that were recorded with the UFO Detector. You can also check out UFOID.net for captures by other users from around the globe.
Follow The Black Vault on Social Media: